
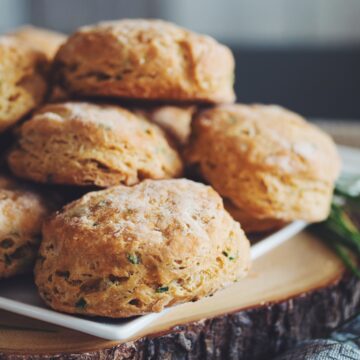
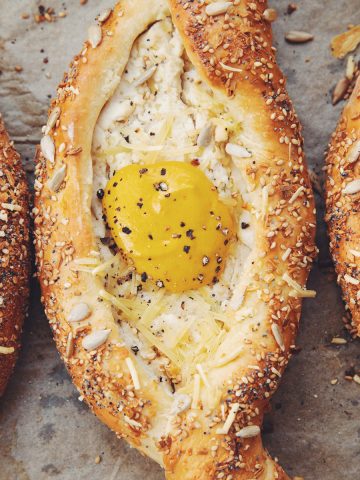
The holidays are about to get extra scrumptious with these vegan cheesy chive biscuits!
Whether you're cooking up a roast, potatoes or classic green bean casserole, no holiday feast is complete without biscuits. That's the truth!
This easy recipe for vegan cheesy chive biscuits is exactly what you need! They're moist, flaky, vegan biscuits that are perfect for sopping up every last drop on your plate. Make sure to top them with some vegan butter or mushroom gravy for an extra savory bite!
Thanks to Silk Canada for partnering with me to bring you this delectable idea. Check out the video below and scroll down for the full written recipe.

vegan cheesy chive biscuits
These vegan cheesy chive biscuits are the perfect addition to your holiday or Thanksgiving table.
Print
Pin
Rate
Servings: biscuits
Ingredients
- 1 C Silk Unsweetened Almond
- 2 teaspoon tomato paste
- 1 tablespoon lemon juice
- 1 teaspoon apple cider vinegar
- 2 C all-purpose flour
- 3 tablespoon nutritional yeast
- 2 teaspoon baking powder
- 1 teaspoon baking soda
- 1 teaspoon garlic powder
- 1 teaspoon sea salt
- 5 tablespoon cold coconut oil
- 3 tablespoon snipped chives
- ¼ C all-purpose flour, for rolling out biscuits
Instructions
- Preheat oven to 450°F.
- In a mixing bowl, combine Silk unsweetened almond with tomato paste, lemon juice, and apple cider vinegar. Let it sit while you combine the dry ingredients in a separate bowl.
- In another bowl, combine all-purpose flour with nutritional yeast, baking powder, baking soda, garlic powder, and sea salt.
- Take chunks of the cold coconut oil and place it in the flour mixture. Blend it with a pastry blender until it forms a crumb like mixture.
- Create a well in the middle of the dry ingredients and pour the liquid ingredients into it. Then gently fold the batter a few times until it just comes together, but isn't fully mixed. Add snipped chives and then fold the dough a few more times until it comes off the sides of the bowl.
- Flour a clean dry surface with extra all-purpose flour. Place the ball of dough on the floured surface and lightly flour your hands so it doesn't stick. Flatten the dough slightly until it's approximately 8-inches to 10-inches wide and 1-inch to 1 ½-inches thick.
- Lightly flour a 2-inch to 2 ½-inch round cookie cutter and cut as many biscuits out as you can. Place them on a lightly oiled baking sheet (use a little coconut oil on the baking sheet).
- Try not to handle the dough too much, but create another smaller round of dough and cut out more biscuits. Depending on the size of your cookie cutter you will get 10 to 12 biscuits total.
- Bake for 10 minutes or until puffed and golden.
- Serve warm with vegan butter and/or this hot for food mushroom vegan gravy!
Notes
You can also add in a vegan cheese product, like chunks or shreds, for extra flavour. Fold this into the dry ingredients at the same time as you add the liquid ingredients.


Rhiannon
I tried making these today but for some reason when I went to roll out the dough it wasn't sticking together so I just ended up putting it in a bread pan and making a loaf of bread. It still turned out really well! It was soo delicious, so good that I ate almost the whole thing today LOL. I can't believe there's not cheese or dairy in these! thank you for this amazing recipe.
Lauren Toyota
I'm glad it worked out anyway! Sometimes the temperature in your kitchen makes a difference. I don't know what went wrong. But baking is a little tricky. So many factors to consider!
Christine
This recipe is awesome! I was too lazy to roll them out and just shaped them into balls. Totally delicious
Lauren Toyota
well glad they still turned out! Cool. thanks!
Caroline
I did those for christmas and they were so good! Thanks for the recipe
Alanna
Can I use soy or coconut milk instead of almonds? My mom is allergic to almonds
Christine
I used soy and they came out perfectly.
Pat
This is the first biscuit recipe that turned out tasting absolutely delicious, since becoming a vegan! It's a keeper! Thanks for sharing it.
Angie
These were absolutely amazing!! Very easy and they taste just like the Red Lobster biscuits we used to eat. Thanks!!
Lauren Toyota
omg love those red lobster biscuits! Thank you
Tom
Hey Lauren, I just had a go at baking these and I must have messed something up, they rose really well but then it started getting weird. They started getting dark and hard on top so I took one out to test if they were done, I cut through it vertically and it was hard and hollow on top but still doughy in the bottom 2-5mm, the middle was amazing and fluffy though. I baked at 220 celsius (about 430F) because my oven doesn't go higher, could that be the problem? Or maybe it was something to do with my quantities?
I was never much of a baker before going vegan so I have no idea about how and why things rise or don't rise etc.
Love your blog/youtube vids btw!
Lauren Toyota
hmmm it might have something to do with oven temp. But also if you adjusted quantities? did you? Baking is one of those precise things so if you sub out anything or replace it with something else it will have a different reaction when baking.
M
I made these with gluten free all-purpose flour (all I had), and the dough became really sticky and kept falling apart. Whenever I added more flour to roll it out, it would continue to stick. I got 8 rolls out of the 10-12, and I found that I had to cook them longer, about 20 minutes. My oven is really hot, so I don't think the heat is the issue.
Kasey
Has anyone tried freezing these to eat later? I wanna make them but I don't think I have the appetite for 10-12 biscuits :]
Kim
This was sooo good!! Everyone thought there was cheese in it, nobody believed that it was vegan!! Thank you Lauren and John !!
Vanessa
Can i make these and freeze them before baking?
Alexis
Lauren- I’m a huge fan of yours. However- when you made this recipe, did you scoop the flour or did you weigh it? I weighed mine, as every recipe that uses a rising agent should be, and let me tell you, 2 Cups of flour was not enough. The dough was so wet I had to add almost 3/4 C extra of flour, and mix it in so I over handled the dough. The flavour is great but I’m just curious to know if you weighed your flour when you created this recipe.
Lauren Toyota
I dont weigh flour for any of my recipes. this is also an old recipe. But I would have scooped into a US measuring 1 cup with a spoon and then levelled
Kiera
I don't have a pastry cutter, would a fork suffice?
MJ
Dang! These were so feking good...haha!